Each section is built in approx. three foot sections. The sections are linked together using nuts and bolts. I'll cover the exact method in a later post.
The first step is to lay out the track. The brand of track you use will dictate your track spacing. I am using Gargraves track.

The stub end siding on the left is for storage.
Note - I haven't laid out any streets yet. Just the track.
My streets are made out of 1 / 4" Masonite ... from the same 2 x 4 sheets that would be used to make backdrops. Don't lay out any streets yet. Build/plan the track on the flat benchwork.
The next step is to cut the long girders. For mine, I make them 12 " (48 scale feet) long. Once cut, I add the vertical stiffeners.

Note I was smart enough to pre-paint these girders before assembly. I have since stopped doing this and the structure is a bit more tedious to paint.
With the girders cut, and using the track layout as a guide, you can cut the cross girders and begin assembly.
I assemble the girders on a large, flat surface (an old shelf from a cabinet).
Below is a picture of the girders being assembled:
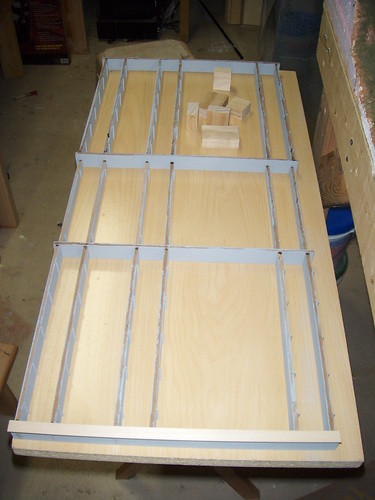

In this picture I have assemble two sections: the three girder span in the foreground and a three girder span in the background. They will be connected by a two girder span in the middle. When building, I check the progress of the structure by placing it on the track to make sure that all the girders line up properly under the running rails.
I haven't yet added any flanges....just connecting the girders.
I use super glue to glue all the pieces together. I don't have the name of the brand I use handy, but I buy it at Hobby Lobby for $4.99. I comes in a green bottle. My next post will have more details as I'll list the tools I use.
To reinforce the joints of the girders, I glue styrene angles to the joints. This adds significant strength to the structure.

Note the joint. I've added a piece of styrene angle to reinforce the joint. I added angles to each side of the girder. I strongly recommend adding these angles as it really strengthens the structure.
In the above picture you can also see some the added detail of vertical stiffeners on the girders. In these shots you can see it is just strip styrene (.030" x .080"). I have since switched to .080" angle as the angle is a lot easier to glue on.
My layout is a shelf style layout, so the structure can only be seen from one side. Therefore, I cheated and detailed only one side of the structure with the vertical stiffeners since you can't see the back side .... laziness on my part.
My next post will cover how I connect all the sections together and add some flanges to the girders. Where you decide to place your columns will dictate how you place your flanges so I'll cover that in a later post.
Note also that I haven't yet attached any columns. That will be covered in a later post also. The height of the columns depends on your eventual scenery plans and I'll show some of the considerations to take into account when planning that.
No comments:
Post a Comment