I've painted the 3D print of the baldie ... I chose the brown and orange scheme ... (and yes, no underbody details, wrong trucks and incorrect roof - more on that later):
This was second attempt at painting a model, so I'm happy with the results. The paint colors used were:
Tru-Color TCP-115 G+W Orange
Tru-Color TCP-163 SP Depot Trim Brown
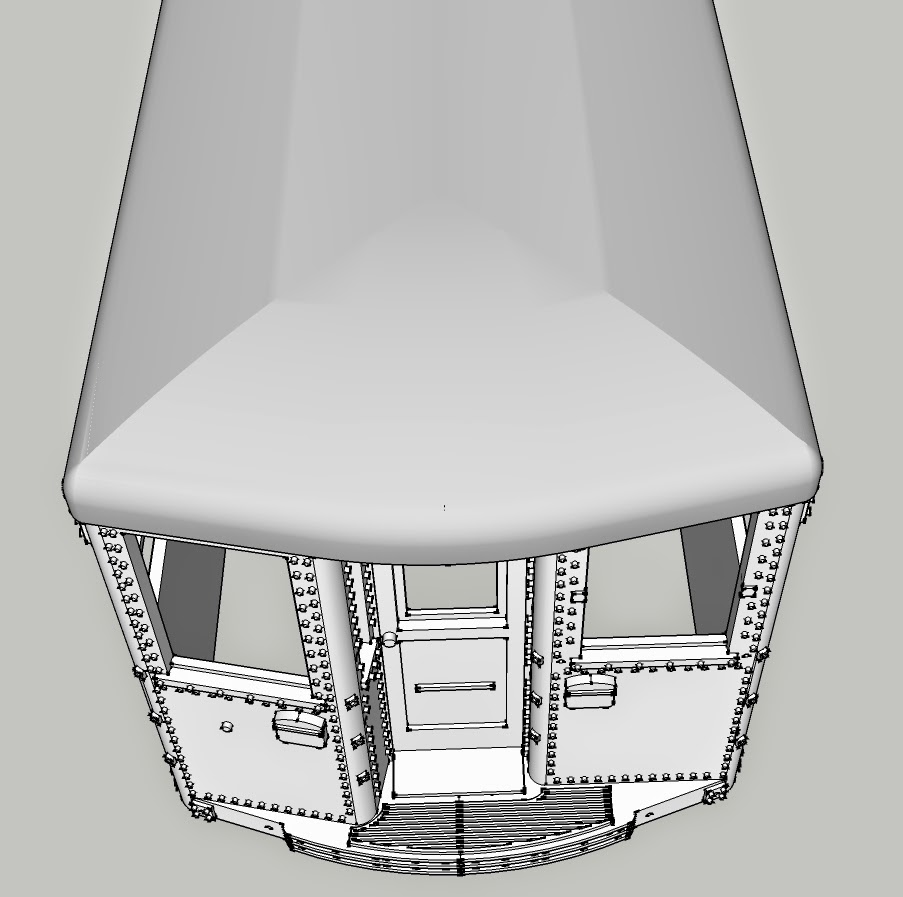
I'm happy with the print quality, but after some review, assisted by local experts, I decided to redraw the roof. Along with the new roof, the letter board on the model was also raised by about 1 1/2" to better match the prototype. Below are the new renderings:
The change isn't dramatic, but I'm trying to capture the more squat, rounded nature of the baldie roof. Since the roof is printed from the material white, strong and flexible, it does not have the resolution to handle rivet details. That will have to be added by the modeler.
Below is a side by side comparison ...
The new version is on the left. The difference isn't dramatic, but offers more vertical surface on the roof to add the row of rivets that is found on the baldies.
I hope to finish up some design details shortly and order a new model from Shapeways soon.
In other news, I've added some new cars to the fleet. First I've added my first interurban, a CA&E Pullman, shown below operating somewhere west of Marshfield in the late 1940's.
Below shows a very rare railfan excursion to the north side:
I've also added to the fleet a Northwestern Elevated Railway trailer:
And to really expand the layout ... and operations, I obtained 3 Q-Car Chicago Surface Lines streetcar models:
These models I'll probably save until the winter or early 2015 as I have no street trackage at this time to run them. But, what is great, is that I have all the necessary parts (bodies, poles, trucks, finishing details and decals) so it should be a really fun project...no internet scrounging for parts.
In other happenings, I've felt like I've been neglecting the layout in working on all the 3D modeling. So, I've been trying to spend more time working on projects on the layout. I've started working again on the expansion L structure by casting more girders and will try to get that done in the next month or two. Also, I've obtained more N-Scale Architect brick sheets so I've started on some additional background buildings.
In this area to the left of the Southport station, I will be building the back of an apartment building. This will be a large (21" long), three and a half story structure. I also need to finish the back porch on the incomplete building in the center of the picture.
I've also begun weathering and adding mortar details to some of my apartment buildings on my residential street. This hasn't been easy as these were basically done. It would've been much easier to weather BEFORE all the windows were installed. I've still got some work to do, but it does look better than un-weathered...
I used two different types of brick on this building, so they take mortar in different ways (or none at all). The white haze is more grey on the model and much more subdued. Plus, I'm still toning this all done with washes, so its not completed.
I've also added new "sliced" building near the Sheridan Road curve...
I've also re-started construction on the apartment building across the street:
I'll post more as more progress is achieved!


Great progress - thanks for sharing! I really like how the Baldie is turning out.
ReplyDeleteCheers!
- Trevor
---
Trevor Marshall
Port Rowan in 1:64
http://themodelrailwayshow.com/cn1950s
What are you using for the car floor of the baldie?
ReplyDeleteAs of now, 0.080" styrene cut to fit. I'm still waiting on my power truck from Q-Car. Once I have that, I may revise. I didn't want to 3D print the floor as it would be expensive.
Delete