Friday, March 4, 2016

What's new for March 2017

Just some updates on some outstanding projects that I've been working on ...

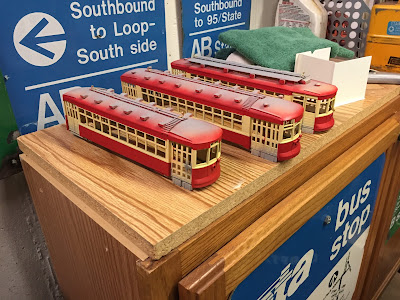
I've starting painting my three CSL cars, using all Tru-Color paints:


First is the cream
Then red underneath the windows


Red for the letterboards


Brown for the doors
The colors used were (all Tru-Color paints):

  • Passenger Car Interior Cream
  • Caboose Red
  • Sante Fe Brown
  • Pullman Green (for underbody and trucks in bottom photo)
I still need to find an appropriate dark grey for the roof, paint the window sashes and do final touch-ups. But progress has been made!

I've also finally added ground cover to the Sheridan curve along with some background trees:


I still need to "tidy" things up, but a little ground cover is better than bare plywood.

I've also added a magazine stand next to my Southport station house. This was a quick build that was made out of pieces from the scrap box. I can't seem to locate the "in progress" photos so the "semi-finished" photos will do. I've added 50 or so O scale magazines for sale. I just need to add some newspapers now:


I may add some additional magazine racks and some other details. But for now, there is a pretty good selection of periodicals for my O scale citizens. 

I've also begun collecting the necessary equipment for pressure casting. Previously. my mold making and casting was done without vacuuming either the silicon or pressurizing the castings. In order to make better castings of cars, I recently acquired a pressurized paint pot:


I will use this for both vacuuming silicone (vacuum pump has been ordered, just not yet received) and for pressure casting. While used for painting, the pot can be easily adapted to pressure casting.


All the attachments for painting have been removed from the lid. I just need to plug some holes and add my valves and gauges.

Most folks use the 2 1/2 gallon Harbor Freight pressure pot, but this one is larger (approx. 14" wide by 12" deep, necessary to fit an O scale car side) and is much more sturdy in construction. The wing nuts for securing the lid are much more substantial than the Harbor Freight model.

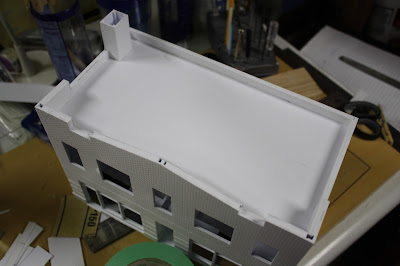
I've also started working on a small brick store front that will go next to my Southport station house.


This was another quick "scrap box" build made of of parts that I had laying around in various scrap boxes. The front of the building is N Scale Architect brick sheeting while the sides and back are JTT Scenery brick sheets. I still need to add stone lintels and other embellishments and clean up some of the mortar, But I did it this way (painting and mortaring before adding stone lintels) as it is much easier to paint. The store front (the white portion) was made separate from the brick and is a press fit. Much easier to paint separately.  

I've also finally attached the trucks to my other Q-Car 4000 series Plushie:


Next up is sending the car to the paint shop.

And finally, some random photos from the layout:


And as always, thanks for visiting!


Monday, February 15, 2016

Very bad at responding to emails ... so a brief question and answer time

Due to various commitments and just plain forgetfulness, I've been pretty remiss in answering various email inquires I've received. So, I thought I'd answer a few questions ...

A train load of answers (hopefully) pulls into the station!
1) Where do I find plans / dimensions / details on elevated structure?

I've found a lot of information via Google searches and especially with various trade publications that were published last century that have been scanned by Google. However, for a more detailed answer ... it all depends. Not the best answer, but like elevated cars, the differences in L structure types are vast. 

But basically, a good starting point is:

For North Side main line type of structure (or Englewood or Ravenswood branch):
    - Length of girders is 48 feet
    - Height of the girder is four feet
    - Height of the structure depends ... but 16 feet from ground to bottom of the girder is a good starting point.
 
For Loop:
    - Length of girders is 50 feet
    - Height of the girder is 5 feet

     - Height of the structure depends ... but 16 feet from ground to bottom of the girder is a good starting point.

From these dimensions, the best answer I can give is to study the real thing. If you can't do it in person (certainly without looking like a terrorist), Google Street View is fantastic for getting up close and personal. Zooming in on various areas of different structure gives a great (and relaxed) view of how all is put together. 

Then, with the details gleamed from Google and some basic dimensions, you can change the structure to fit your needs on your layout. What worked for me may not work in your situation. Each layout (and what you desire from it) is different. As they say, your mileage will vary.

Also stay tuned as I slowly build more details models of L structure ... I'm working on that now so more posts will appear in the future.

2) Where can I find models of the elevated cars?

Since I model in O scale, I have a combination of MTH 3 rail elevated cars (the 3200's and the 6000's), some Q-Car 2 rail cars (Northwestern Elevated, 4000 series plushies and CSL cars), a set of Island Model works 2200's, Clouser North Shore cars, and a Chicagoland Hobby CA&E car. Plus, add in some 3D printed 4000 series Baldies for fun.

From near to far: 4000 series Baldie motor (3D printed); 4000 series Baldie trailer
3D printed), Q-Car 4000 series Plushie and wayyyy in the distance a MTH 3200.

MTH 3200 in foreground, MTH 6200 in middle and Island Model Works 2200
in rear
Q-Car Northwestern motor and trailer and a very lost Q-Car CSL streetcar
Clouser North Shore Cars (with Plushie tucked behind)
Chicagoland Hobby Resin Kit CA&E car

As for other models / scale, please refer to Ed Halstead's excellent blog Modeling Insull's Empire in O Scale. Ed has several posts listing various models that were available in O and HO for Chicago. He has multiple posts and lists, so search through the old posts. Ed's blog is linked to in my list of favorite blogs.

3) Are you still selling the Baldie model?

Yes and no. Its best to contact me before you pull the trigger. There are some ... pitfalls. The design is good and if all goes well at Shapeways (that's a big IF) ... it makes for a great model. If not ... things get expensive as reprints are needed.

4) Any more 3D printed cars coming?

Plans are to complete a Met 2800 series and get ready to print a Joliet and Southern Interurban (local road for me). As with the Baldie, I have to out-smart Shapeways' inherent idiosyncrasies. Its too much to write here, contact me if you want the full and very long story.

5) Where do I buy L structure (pre-made)?

I do believe there are a few companies that sell components. Bridge Boss and Imagine That Laser are two that come to mind. 

All my L structure is scratch built. See previous posts for various construction articles.

Watch the end of the line!

6) Where can I buy the buildings you have or how did you make them?

With the exception of two buildings on my layout (one Ameritown 3 story brick building and a wooden garage) all of my buildings are scratch built.

A review:
- Track is 3 rail Gargraves. I'll be replacing this in near future with 2 rail as I convert to 2 rail
- Turnouts are Ross. Those too will be replaced with two rail.
- L structure as mentioned in scratch built
- All other structures and station platforms are scratch built.

The buildings are made from sheet styrene, home-made window and door castings and brick sheeting. I obtain most of my brick from either N-Scale Architect (good stuff!) or from JTT Scenery.

Back wall with window and door castings

Construction in progress
Southport Station under construction

I don't really build the building from plans. I search Google Street View for something interesting (and easy to build) then modify it to fit the space.

Well, this one I did draw out. But no scale, just visually to size and
appropriate "fit" to the scene based on the height of the door (7 feet),
7) Why the switch to 2 rail?

Why not? It will look better ... I'll just have to convert all my MTH cars to two rail. Should be easy, right? That will be a most interesting project.

Well, that's all I can think of for now. If I can think of anything else, or if any more come up, I'll do another Q & A post.

But, the ultimate answer is that there are no easy answers. Traction is a niche part of the niche hobby of model railroading. Modeling elevated traction is even rarer. Therefore, one's ready made resources shrink to an almost non-existent level. Scratch building is really the only good answer to most questions, unfortunately!

Monday, February 1, 2016

Organization!

Not much work has been done on the layout lately ... or nothing that really shows much progress.

However, that doesn't mean work ever stops. Instead of focusing on the layout, I've decided to try to organize my working area and materials storage a little better.

One area that has always been an issue is the storage of styrene and paint. I haven't been able to find an effective storage solution yet that also combines ease of retrieval / viewing of what I have. A trip to the local Ikea came up with what I believe to be the best solution I've found so far:

The Ikea "Alex" six drawer unit:


At $119, its not the cheapest solution but I'm happy with the purchase.

For styrene storage, I made drawer dividers from styrene strips:


Its maybe not the most efficient use of space, but it is well laid out and easy to view what I have in stock. The styrene collection takes up four of the drawers with the fourth drawer having a section for sheet styrene.

For strip wood, I went lengthwise with MDF dividers (ran out of styrene for dividers):


Paint for airbrushing was also compartmentalized in the same manner:


The drawer unit is on casters, but I don't plan on rolling it around. I would eventually like to get another drawer unit to stack on top, but for now, this definitely helps in organization.

In other happenings, a sound bar has been added to the TV! Doesn't help much for the volume on the TV, but helps with listening to music.


The O scale people in the neighborhood have yet to complain, so its time to turn up the volume!

Sunday, January 10, 2016

A tool recommendation and a themed weekend of truck mounting

With some of the older Wagner, Q-Car and Current Line power trucks I have requiring that holes be cut in the floor of the model, I've been unsure as to the best way of accomplishing this task. This was really delaying the progress of my three CSL street cars and my two 4000 series Q-Car Plushie models.

So, I acquired a Rockwell BladeRunner, which is basically an upside down mounted jig saw that incorporates a table with a miter slot and guide fence. I thought that this might be a little more versatile than a scroll saw in that it could possibly cut more materials (especially metal).


The saw blade sticks up from the table, the drop down "guide" has two
rollers that act to stabilize the blade. It also can be removed. On the
table is the floor for a CSL Safety Car.

For $100, I am actually very happy in how it performs. After drilling a hole for the saw blade, cutting the holes for the motor is a breeze. I "free-handed" the above hole, but could have used the fence for a more straight cut.

With one floor done so quickly ... things quickly spiraled out of control! With one car done, I decided to work on the CSL MU car and got that car's trucks mounted:


CSL MU Car and Safety Car ready to roll to paint shop!

Luckily I had the CSL Plan book so I was able to accurate space the trucks as for these two cars the floor is wood with no locating holes. Both of these cars have Q-Car power trucks.

Once these two were done, my zombie Q-Car Plushie (the one that had previously been smashed and I put back together) was up next. For this car, it is using an older Wagner set of trucks but with a Q-Car bolster on the un-powered truck. A new floor was cut from plywood as the original wood floor was warped. I used the same Rockwell BladeRunner to cut the floor...which was much easier than dragging out the table saw!


Hole cut, now just need to mount the power truck.
Mounting this older Wagner style truck was a bit trickier as the brass cross piece / bolster was riveted to the motor and was basically soldered to the actual motor. So I really couldn't remove it to properly set the brass cross piece. So ... just had to improvise.

I use styrene to build up around the hole for the required spacing for the motor.


I prefer to use styrene as its easy to cut and glue, and well basically its what I had on hand. A few layers are build up until the floor is level and a box is made around the hole. Holes are then drilled and tapped into the styrene and the motor is mounted.


A couple of notes: stryene may not be the best for longevity for drilling and tapping as it is a relatively soft material. Care must be taken when attaching the screws as to not strip the threads. But, it works for me. If it ever strips out, I can tap to larger screw or add a brass sleeve. Also, I ran out of shorter 2/56 screws so I had to add "spacer" nuts. I later glued sheet styrene across the top of the motor to make a closed box.

Before anything was glued, I did test the car through my tightest turn and no clearance issues!


Before final mounting ... a three car train of 4000's ... two Baldies "book ending" a
Plushie
With trucks mounded on three models, I decided to tackle a problem I've been avoiding for some time ...

My Q-Car CSL Pullman came with a white metal cast floor that had a slight bend to it. When I initially took the floor off, it snapped in half! Curses I thought. I did try to make a wood floor, but before completing that, I figured I would see what could be done with the metal floor as it was nicely detailed and had mounting locations for the trucks.

For this car, I have a Current Line power truck that will require a hole be cut in the floor.

Luckily the new saw (with a metal cutting blade) made easy work of cutting the hole. The floor being in two halves also make cutting the hole very easy as the part was easy to manage on the saw ... an unexpected bonus.


Hole cut and non-power tuck mounted. Note the split right down the middle.
That might not work ... too large of a hole for the power truck!

I figured I could use a piece of 18 gauge sheet metal (left over from my days of restoring rusty British sports cars ... you know they are rusty when you by your patch sheet metal in 4 x 8 sheets, a truly bad sign) as a splice and epoxy the two halves back together. I used this for strength ... and since I didn't have any brass sheet on hand.


The two halves and the sheet metal splice ... cut on same saw ... easily
I might add!
I used 5 minute epoxy to glue everything together, and once dried, I was rather happy with the result. The splice seems to hold nicely.


This was much easier than making a new floor.

With the floor back in one piece, I was able to mount the Current Line truck. Luckily the brass bolster was removable which made drilling the holes much easier. Again, I was out of short 2-56 screws so I had to use spacers from nuts. But, it works! Again,for ease of use and as it was what I had on hand (and my material of choice) I used styrene to mount the truck. I will enclose the hole with a box later.


I tape down the motor wires so not to pinch them when reattaching the body.
Finally all three CSL cars have their trucks mounted!


I definitely need shorter screws ... but it rolls!

Sunday, January 3, 2016

Happy New Year - 2016! Layout resolutions for the new year ...

First, a Happy New Year to all!

Since resolutions are all the rage this time of year I've decided to try to set some layout goals / resolutions for the New Year! I unfortunately too many projects ... but its nice to try to at least set some goals.

First off ... a review of the layout as of the beginning of 2016:


There really hasn't been much improvement over the last year, just some small detailing and refinements.

But ... for 2016, some of the goals / resolutions I'd like to accomplish are:

Continue / finish the refinement of cast resin L structure as detailed in earlier posts:


This should be an easy goal as I've got most of the plans and techniques down. I would like to invest in some better casting tools (vacuum chamber and pressure pot), but those can be leveraged for use in other projects.


This is a combination of cast resin girders, 3D printed braces and scratch built
columns, Next version will be all cast resin for speedier construction.
Finish backlogged car projects:

This is an area I've really been slacking. I seem to take forever in finishing a car model. Some of the projects I need to finish are:

A slew of CSL models, one North Shore wood car (that will be repainted in CA&E colors) and a 4000 series CTA plushie (who knows what will happen with the 3D printed baldie prototype):

The "shops", always a mess of parts 


I have almost everything to finish these models except motivation! 

I HAVE actually made progress on the Northwestern motor car. The paint is about 90% done and the trucks have been mounted.

The trailer on the left is finished. The motor is on the right ... still unfinished.
My 2000 series CTA cars still languish in an unpainted state. I need to resume this project and get these cars finished.

I still need to perform additional sanding and filing on the shells. 
But, most importantly, I need to finish two CRT Baldie projects. One is my 3D printed car (one end still needs finishing) and I need to finish another Baldie model for a good friend. 

Another unfinished 4000 series Plushie sits behind these cars ... yet another car to
finish.
The car on the left will be an un-powered trailer. The biggest delay has been attempting to paint match this to other cars ... with little to no luck.

Refine the 3D printing process for car creation

While I have been successful in getting two complete 3D printed O scale cars built, the process hasn't been entirely painless or as effortless as I'd like.

I've had some quality issues with Shapeways, and due to the cost of the parts, I haven't continued building additional 3D printed cars. 

I do, however, have several almost completed 3D models of cars that I'm hoping to print this year. However, knowing the limitations of the 3D printing process along with the costs and quality control issues, I've decided to take a slightly different approach for my next cars. 

  • Limit the amount of parts and leverage resin casting to duplicate the highest quality parts. For example, I'd like to print one end (assuming the car's ends are symetrical) then make molds and cast multiple copies.
  • Incorporate additional scratch building or non-3D printed materials into the models. I've found that car sides are very problematic for Shapeways to print with consistent quality. Therefore, I may use more traditional scratch building techniques or materials to supplement the 3D parts.
In addition to the above points, I really need to write a synopsis of the whole 3D printing experience. I hope to accomplish this in a series of future posts. I still believe that the process can greatly aid in the creation of O scale models. However, its more of an additional tool to use rather than a magical process that can create a ready to roll product.

Add additional lighting and interior details to the layout

Over the past few months I've begun experimenting with adding interior details and additional lighting to the layout. I'd like to add interiors to most of my foreground buildings and attempt to illuminate most of the others.

Some of these lighting efforts have been detailed in prior posts but I've recently begun to illuminate some of the buildings underneath my Southport Station.


In addition to adding interior lighting, I've also begun experimenting with adding nano LED's under the L structure to help illuminate the scene a little better. Right now the LED's are just placed between the girders, but I'm going to look for some O scale light fixtures that I can attach the LED's to. I do like the effect as it just brightens the scene.

Continue posting frequently to the blog

Looking back at 2015, I did manage to create 32 posts to the blog. I would like to top this number for 2016 as the blog does act as a driving force to accomplish goals and projects on the layout.

And a long shot goal ... start the newest expansion of the layout!

What currently acts as a "catch all" shelf is supposed to be an expansion of the layout to an elevated terminal.


I would like to put an elevated terminal with a small shop and yard (based loosely off of the now demolished Logan Square terminal) or the also demolished Wells Street terminal. Either one is a tight fit, but who says you can't make big plans?

All in all, big plans lay ahead for 2016. I'm sure I missed a few projects, but there's always 2017! Let's see what I get accomplished.

Thanks again for reading and hope you have a successful 2016!