Saturday, July 30, 2016

Tight Space Modeling ... or there is no excuse

So I have downsized to a one bedroom condo and demolished by basement layout ... but ... that doesn't mean I've given up on traction modeling.

Traction modeling certainly lends itself to smaller spaces, even in O scale.

However, not having a sprawling basement means that you have to be a little more strategic in tool choices and storage options.

I thought I would share some of my solutions for tight modeling space ...

First off is I do like to paint. So, I bought a fold up spray booth that works quite well and I also bought a fold up table to put the booth on. I run the exhaust out the balcony door and for lighting, I swing my reading lamp over which gives more than enough light.


Also shown in the above photos is my work space which is an Ikea desk. The drawer until is good for small tool storage. I have a sheet of glass on top to provide a smooth, easy to clean surface.

Another requirement for painting is a compressor. Since I also want to do pressure casting, an actual air compressor rather than an air brush only smaller compressor would be required. However, living in an apartment means that noise would be a concern. I ordered a California Air Tools Ultra Quiet compressor which should suit my needs nicely.


The remainder of storage is accomplished via two Ikea drawer units that hold all my scratch building materials and paint. I have a small hobby saw that sits on top. A metal cabinet holds all my chemicals and spray paint cans.


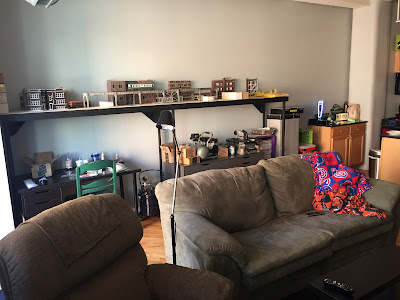
The whole area is 12 feet long by 20" wide. Modest by any measure, it suits my needs and still allows me to model. The layout acts as a nice "objet d'art" in the living room and is always a conversation piece. As long as I keep things tidy, it doesn't distract from the overall living room experience. 

I chose my living space for location over space. The commute to my office is 2,200 feet, or about a 8 minute walk as I have to go down seven floors. But, I didn't want to give up on my hobby so accommodations had to be made and I think I've made the best of them.

Plus, I'm about 50 feet from the Blue line for quick access to anywhere in Chicago ... or rail fanning ... or just awesome city living!

Below is a short photo essay of the 'hood:


Wednesday, July 20, 2016

Rebirth!

From the ashes arises new and better things!

So, after a location switch, I've finally gotten established in my new home. The modules are set up, the models unpacked and some buildings are out of long term storage.


I'm doing two straight modules, each 6 feet long and 20" wide, The height is rather high at 56" but that was done intentionally. My last layout was rather high and I really liked the effect at looking at the models. Another reason as to why the modules are so high is so that I can fit lots (all the tools and equipment) underneath. 

In the above photo, you can see (from left to right): worktable - with my sheet of glass of cutting, the pressure pot for casting, the air compressor for air brushing and casting (ultra quiet variety), two Ikea storage cabinets for parts and material storage, a metal cabinet for chemical and paint storage, and finally a bookcase with all my traction magazines nicely stashed away. This all fits in a space 20" wide by 12 feet long.

As for space, I certainly do not have a lot. BUT ... never let space get in the way of your modeling! I've decided that modeling and my hobbies are a priority in my life (for my own mental health!) and the modules fit within my lifestyle. A view of my living room:


As long as I keep it orderly, I'm happy to share my living space with my hobby. By the way, it makes for a great conversation piece and all the ladies love it. It shows creativity!

The plan is to do at least one module as Wells Street in the Loop. I'm going to model the Loop style of elevated along with two street car tracks underneath.

Right now, its just great to have my models unpacked and visible.


Goals (in addition to working on this new layout/modules) are:

  • Additional 3D printed cars
  • Using the 3D prints as masters for casting
  • Making molds and casting for Loop elevated structure
  • Making more realistic store fronts and buildings
  • Learning to hand lay track
And, most importantly, all now is 2 RAIL! No more 3 rail for me!

I only have one small problem, the view and outside distractions of my new neighborhood are mighty indeed!


Saturday, July 9, 2016

Demolition Derby!

Due to an unfortunate life event, I was forced to take down my layout. Some views of the demolition:


Just has happened in real life, elevated service was ended. A sad day indeed,

All of the buildings were saved, but I wound up only saving the newest section of structure that was the most detailed:


Knowing that I would be downsizing, I built two semi-portable modules, each 6 feet long and approx. 20 inches wide:


I am planning on incorporating both streetcar trackage and elevated structure. Right now the plan is to model a stretch of Wells Street.